How to Use AirDrop on iPhone: A Step-by-Step Guide

Good morning, Apple fans! Ever needed to quickly share a file, photo, or even a location from your iPhone to another Apple device? Airdrop is your secret weapon. Today, we’ll explore the benefits of using Airdrop on iPhone and demystify the process of getting it up and running. So, without further delay, let’s get to it!
Everything You Need to Know About Using AirDrop
Setting Up Airdrop on iPhone

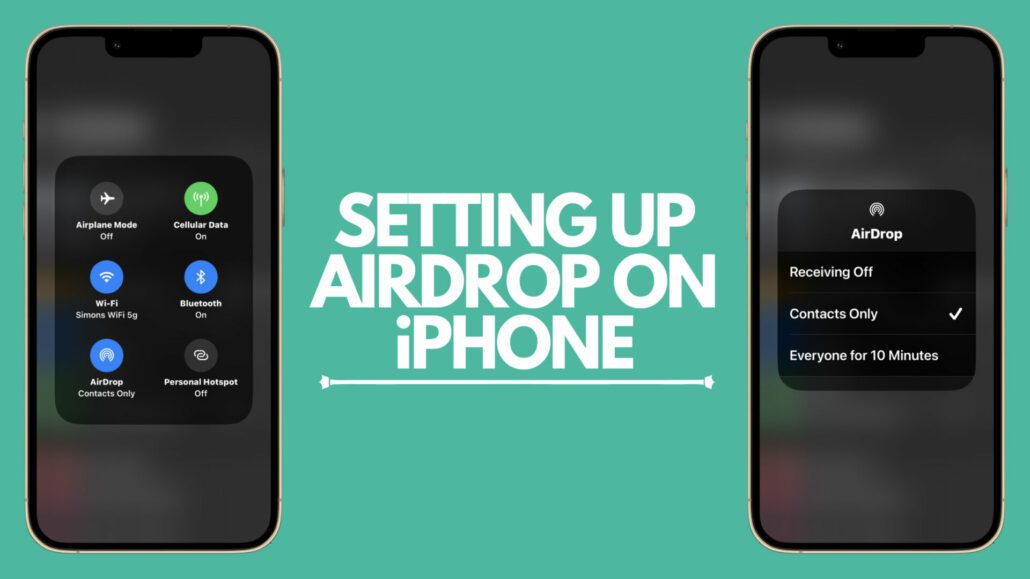
First things first, let’s get you set up. You’ll be happy to know activating Airdrop on your iPhone is as easy as pie. Start by opening the Control Center (swipe down from the upper right corner of your screen on recent models, or swipe up from the bottom on older models). You’ll find the Airdrop icon in the network settings section, right between the Wi-Fi and Bluetooth icons. Tap it, and choose your preferred discoverability option.
You can choose from “Receiving Off” (Airdrop turned off), “Contacts Only” (only people in your contacts can see your device), and “Everyone” (all nearby Apple devices using Airdrop can see your device). Be mindful of your settings to maintain your privacy and prevent unwanted file transfers.
Using Airdrop between iPhones
Now that we’ve got Airdrop activated, it’s time to do some file flinging. To Airdrop from iPhone to iPhone, open the file you want to share, tap the share button (the box with an arrow pointing up), find the person you want to share with in the Airdrop section, and then tap their name. Wait for the file to transfer, and voila, you’ve just completed your first Airdrop!
Using Airdrop between iPhone and Other Apple Devices
The beauty of Airdrop is that it’s not just iPhone to iPhone. You can just as easily share files with your Mac or iPad. The process is pretty much the same; just make sure the recipient device has Airdrop activated and is within Bluetooth and Wi-Fi range.
Troubleshooting Airdrop on iPhone
Stuck with an Airdrop that’s playing hard to get? Don’t worry, we’ve all been there. A quick fix often involves checking if both devices have Wi-Fi and Bluetooth turned on, ensuring both devices have Airdrop set to ‘Everyone’, and making sure they’re close enough (within 30 feet). If you’re still having issues, try restarting both devices and giving it another go.
Advanced Tips and Best Practices
Now that you’re a pro, let’s share some expert tips. Keep in mind that Airdrop works best when the sender and receiver devices are signed into the same iCloud account. This can be especially useful when sharing larger files as it can speed up the process.
And while there’s no hard and fast rule about what you can or can’t share, Airdrop shines with media files like photos, videos, locations, and even website links.
Conclusion
So there you have it, folks – your comprehensive guide on how to use Airdrop on iPhone. As you can see, it’s a powerful tool for quickly and efficiently sharing files across your Apple devices. Say goodbye to lengthy email attachments and hello to Airdrop!
I’d love to hear about your experiences with Airdrop! Feel free to leave a comment below with your own tips and tricks, or any questions you might have.
And, for more guides, reviews and deal alerts, don’t forget to swing by and join my Facebook group!
Tony has a bachelor’s degree from the University of Phoenix and over 11 years of writing experience between multiple publications in the tech, photography, lifestyle, and deal industries.


Leave a Reply
Want to join the discussion?Feel free to contribute!